Setting Up A Bid Experiment
This page explains how to set up a ping post bid experiment within boberdoo’s Bid Experiment tab. To begin, nagivate to the Bid Experiment>Analysis page and click Add New Experiment.
Step 1: Lead Type
Select the lead type that you would like to run a bid experiment on.

Step 2: Source
Select the Source value that you would like to run a bid experiment on. Your experiment will only apply to pings with this SRC value. However, you can add additional ping criteria in the next step.
Note: Each Source value can only be utilized in one active experiment at a time. If you don’t see the SRC that you would like to use in this step, that means it is already being used in an active experiment.
Step 3: Additional Criteria
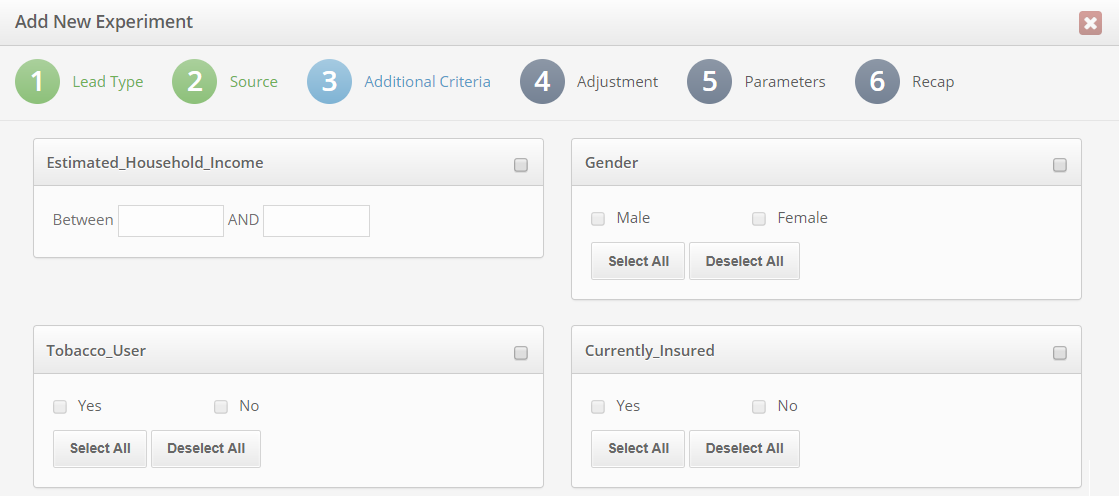
This step allows you to set additional criteria for pings that qualify for this bid experiment. Any pings (even those with the SRC selected in step 2) that do not meet all of the criteria set in this step will not qualify for this bid experiment.
Additional Criteria Fields: This step includes all fields in your selected lead type that are required on the inbound ping. Select the checkbox to activate a field and add corresponding values to specify your criteria.

Days you accept leads?: This allows you to limit the pings that are used in this experiment to only those that come in on the days you specify. (E.g. Only run the experiment on leads from Monday-Friday.)
Time of day you accept leads?: This allows you to limit the pings that are used in this experiment to only those that come in between the daily timeframe you specify. (E.g. Only run the experiment on pings from 8am-5pm.)
Step 4: Adjustment
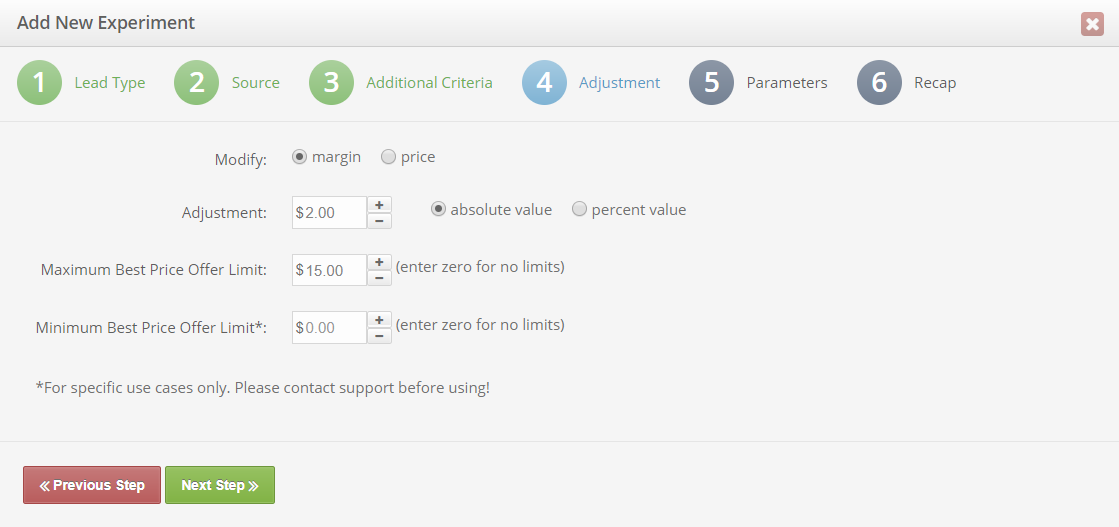
Modify: This option specifies whether your bid experiment will be testing a positive or negative change in your current margin settings or current price set for qualifying pings for the SRC you selected in Step 2.
Margin: This option should be chosen by those who buy and sell leads and create a profit from the margin realized by the difference of the lead cost and the sale price. With this option, the algorithm will test a higher and a lower margin by leaving the final price the same.
Price: This option should be chosen by those who buy leads and would like to optimize the pricing strategy on bidding. With this option, the algorithm will test a higher and a lower bidding price and calculate the buying rate for the current setting and the increased/decreased prices.
Adjustment: The adjustment controls the change in either your margin or price (as selected in the previous step) in relation to the current setting (control group). This adjustment is then used to influence your bid on the ping. When making the adjustment, you can use either an absolute value or a percent value.
Absolute Value: The absolute value is an addition or subtraction to the control group bid based on the positive or negative value used.
Margin Adjustment Example: If your current margin is $1 and the absolute value adjustment is $2, your new magin will be $3. This will decrease your bid amount.
Price Adjustment Example: If the ping’s current price is $10 and the absolute value adjustment is -$2, the tested bid price will be $8.
Percent Value: The percent value is an addition or subtraction to the control group bid based on the percentage increase or decrease that you apply.
Margin Adjustment Example: If your current margin is $2 and the percent value adjustment is -50%, your new margin will be $1. This will increase your bid amount.
Price Adjustment Example: If the ping’s current price is $10 and the percent value adjustment is 30%, the tested bid price will be $13.

Maximum Best Price Offer Limit: This setting acts as a bid ceiling for this experiment. After the adjustment is applied to the bid, the system will run the price against the Maximum Best Price. If the maximum best price is exceeded, the Maximum Best Price value will be used. This acts as a fail-safe to prevent your system from ever bidding more than your specified amount. However, all bids adjusted due to this setting will not be included in the final analysis of this experiment.
Minimum Best Price Offer Limit: This setting acts as a bid floor for this experiment. However, this should only be used in specific cases. Please contact support before using.
Step 5: Parameters
What percentage of total matched pings should we apply to this experiment?: This percentage dictates the amount of qualifying, matched pings that should be included in this experiment. Of the percentage you specify, half of the pings will run using the unadjusted control group’s bid and the other half will use your modified bid.
Before deciding on a percentage of matched pings to use for this experiment, consider the following factors:
- Experiment duration: a higher percentage of matched pings used will cause the experiment to hit its sample size sooner. The lower the percentage, the longer it will take
- Risk: the lower the percentage, the lower the risk of losing profit or lead volume in case the results of the adjusted price do not meet the initial expectations.
For beginners or high-risk experiments, we recommend using 5-15% of matched pings. For experienced users or quick results, feel free to use 80-100% of matched pings for testing.

I want to run this experiment until: When this number of matched pings is reached, the experiment will stop. The number of pings involved in the experiment influences the statistical significance level. For a statistically significant result, the higher the sample size, the better.
Name Your Experiment: We recommend using a consistent naming convention that describes the experiment for organizational purposes.
Notifications and Email for notifications: Assign one or more email addresses to be notified when the experiment has been started, completed, stopped, paused or deleted. To use multiple email addresses, comma separate each address.
Step 6: Parameters
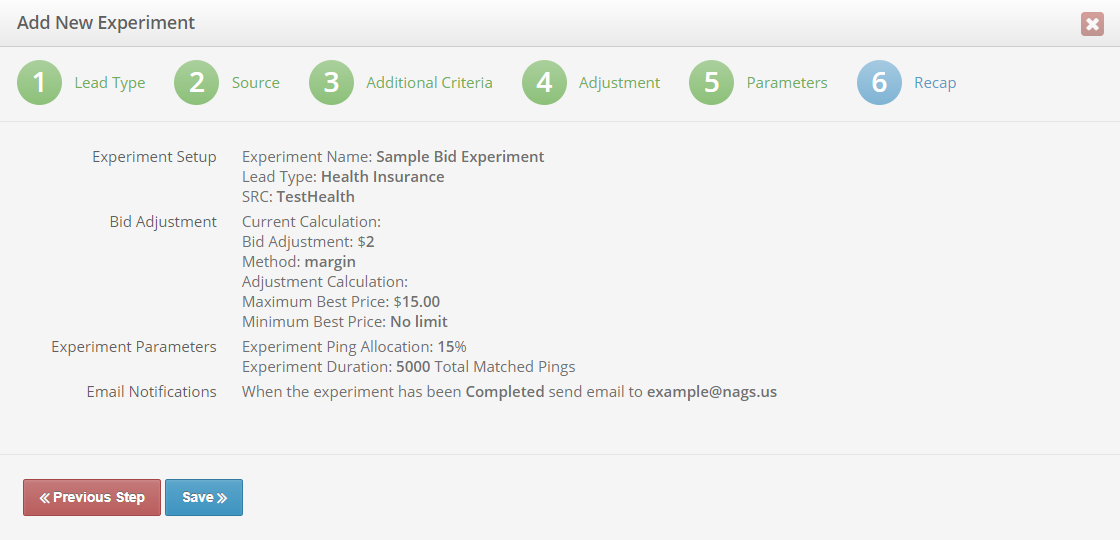
Finally, review the details of your experiment. If you’d like to make any changes, navigate using the numerical menu or the Previous Step button.

Launch Your Bid Experiment
After saving your campaign, it will be placed in the Draft status. At this point, you can still edit your experiment. Once you are satisfied with your experiment configuration, click the Start Experiment button. Your experiment will then be placed into the Active status and begin running to your specifications.
You can pause or stop your experiment at any time. Additionally you can view your experiment settings, although they can no longer be adjusted. When your experiment reaches its designated ping total, it will be changed to the Completed status. At this point you can navigate to the experiment dashboard to review the results.
What to consider when setting the minimum sample size?
- Significance level: The number of pings involved in the experiment influences the statistical significance level. For a statistically significant result, the higher the sample size, the better. As a general rule, we recommend using a sample size of 1000 to 5000 matched pings.
- Adjustment: Results of smaller impacts are difficult to detect. Due to variations, the lower the adjustment value the more examples we need for the experiment. We recommend using higher sample sizes when experimenting with low adjustments (~1-5%). Acceptable significance levels however could be reached with a smaller sample size (~500-1000) as well if the adjustment is relatively high (~30-40%+).
- Conversion rate: the number of sold leads compared to the number of matched pings within an experiment are also an important factor in determining the significance level and hence the sample size. Small conversion rates require setting the sample size higher than usual.
See the following table to see recommendations to reach 90%+ significance level for different adjustments and conversion rates.
| Example | Adjustment | Conversion Rate | Recommended Sample Size |
| 1 | 1% | 1% | 10000+ |
| 2 | 10% | 10% | 1000-5000 |
| 3 | 50% | 30% | 500-1000 |
ProTip: Running experiments for sources with low incoming ping volume can be very slow. To shorten the wait set a higher adjustment value. This will let you use a smaller sample size to reach the required minimum significance level. And with a smaller sample size your experiment will end sooner.

